|
|
|
|
(1) Top things to watch out
for
|
|
The following is a list of the top things to look out for:
(A) Printer
Auto-Adjust Settings -
Whichever printer you are using, if there is a setting in the printer driver
that states something like "auto adjust images" then you should NOT have that
option selected. The problem with "Auto-Adjust" is that your printer
software will adjust the lightness of each tile image separately.
This can cause a lightness or color mismatch between adjacent tiles.
(B)
Printer Layout Settings -
Some printer drivers have settings that will crop part of images off (i.e.
"crop to fit" options). You should not avoid these
settings.
(C) Avoid Windows
Print Wizard "Photo" Setting - If
you are printing with the Windows Print Wizard, then you should choose the
"Fax" layout option instead of the "Photo" layout option. The "Photo"
option crops (cuts off parts of) your images.
Go to Top of Page
|
|
(2) What
you need to get started
|
|
In order to start using Poster Buddy, all you need a digital image and
access to a printer:
(A) Digital Image - Your
digital image can be from any source. The file format should be
Jpeg, Tiff (uncompressed), or BMP. The higher the resolution, the
better. It is better to use images with a minimum resolution of 2 or
3 megapixels, but any image can be used. It is best to avoid very low
resolution email or internet thumbnail images.
(B) Printer -
You can use any printer to print your photos with. This includes inkjet,
laser, thermal, and you can even print your poster at your local photo lab
(as a series of 4x6" tile photos). If you are using a borderless printer
then it probably is a good idea to create an "Edge Calibration" profile in
Poster Buddy for your printer.
(C) Assembly
Materials (optional) - Depending on how
you want to assemble your poster, there are a few materials that you might want
to use:
>> Tape or adhesive
spray
>> Poster board (if you
want a stiff backing for your poster)
>> Frame (if you are
framing your poster)
Go to Top of Page
|
|
(3) Select Poster
Source Image
|
|
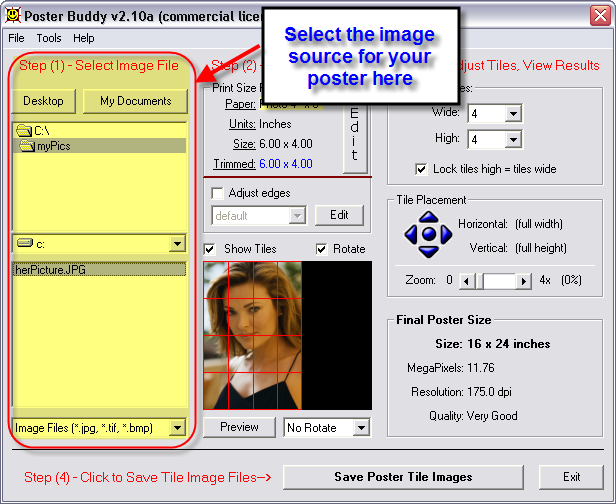
Selecting the source digital image to make your poster from is fairly straight
forward. You first select the folder containing your poster source
image. After that, you select the particular poster source image
from the list. Once selected, the image will be displayed:
Go to Top of Page
|
|
(4) Select Paper
and Margin Size
|
|
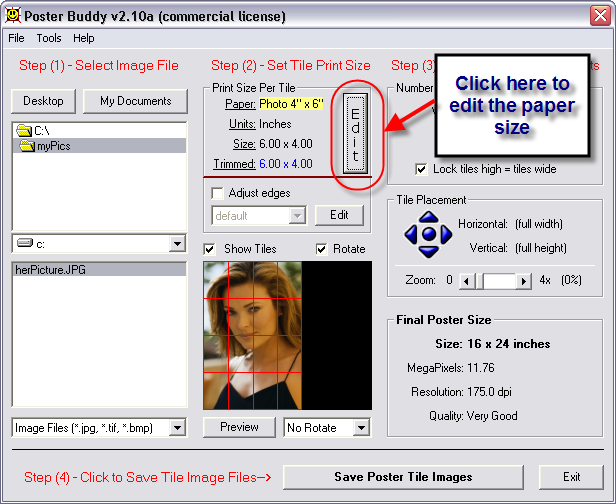
The "Print Size Per Tile" section of Poster Buddy shows your
currently selected paper size. It also indicates how large the
margins on your prints will be. The "Trimmed" size is the size of
each poster tile print after the margins have been trimmed off. The paper
size and/or margin size can be changed by clicking the "Edit" button.
(A) Open Paper Size
Dialog:
(B) Select the
paper and margins being used:
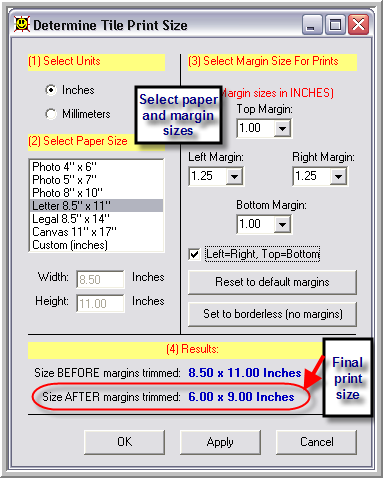
Note - After you select the paper
and margins that you are using, you can see the "final print size AFTER
margins trimmed" and confirm that it is what you expect.
When you are finished entering the
paper/margin information, then click the OK button.
(C) Sample
Paper/Margin Values - The table below here
shows some typical values that would be entered for various printer/paper
combinations:
|
Printer/Paper
|
Paper selection
|
Margins selection
|
| HP Inkjet printing on letter size paper, set to print an
8x10 inch tile image |
Letter 8-1/2 x 11 inch |
Left, right margins=0.25 inches each, top and bottom margins = 0.5
inches each |
| Epson inkjet print, set to print letter size paper, borderless mode
|
Letter 8-1/2 x 11 inch |
Left, right, top, and bottom margins all = 0.00 inches (borderless) |
| Kodak Easyshare dye sublimation 4x6 inch printer |
4x6 inch |
Left, right, top, and bottom margins all = 0.00 inches
(borderless) |
| Walmart photo lab (Fuji photo system), printing 4x6" photos |
4x6 inch |
Left, right, top, and bottom margins all = 0.00 inches (borderless) |
Go to Top of Page
|
|
(5) Edge
Calibration
|
|
Many printers cut off part of the edges of images. This is
especially true for printers that do borderless printing. This can
be a real problem when making posters. Fortunately, Poster Buddy has a
solution for this. The Edge Calibration feature of Poster Buddy allows
you to measure and compensate for the amount of edge clipping that your
printer does.
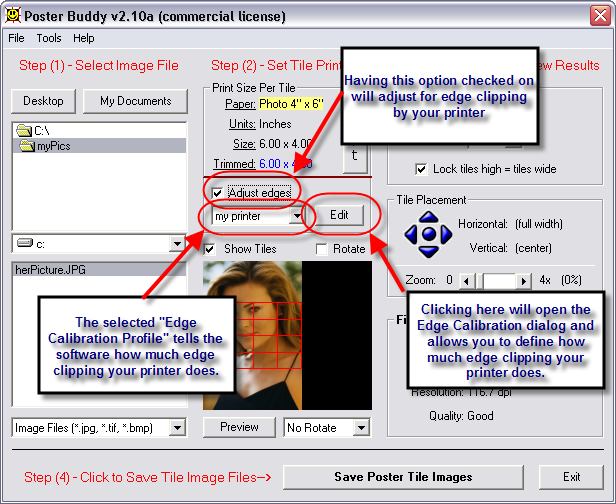
To compensate for this edge clipping, you need to check on the
"Adjust edges" checkbox and select the Edge Calibration profile for your
printer from the adjacent dropdown box. If you haven't made an Edge
Calibration profile for your printer, then you can click on the small
"Edit" button (or select the Tools->Edge Calibration menu option) to
open the Edge Calibration Dialog.
(A) To Activate Edge
Calibration:
(B) Defining
the amount of Edge clipping you printer does:
In order to define how much "edge
clipping" your printer does, you create a new "Edge Calibration Profile" for
your printer. This is a configuration file that contains information
about how much is lost from the left, right, top and bottom edges of images
when they are printed by your printer. All this is done in the "Edge
Calibration" dialog, which can be opened by clicking on the "Edit" button (or
Tools->Edge Calibration menu option):
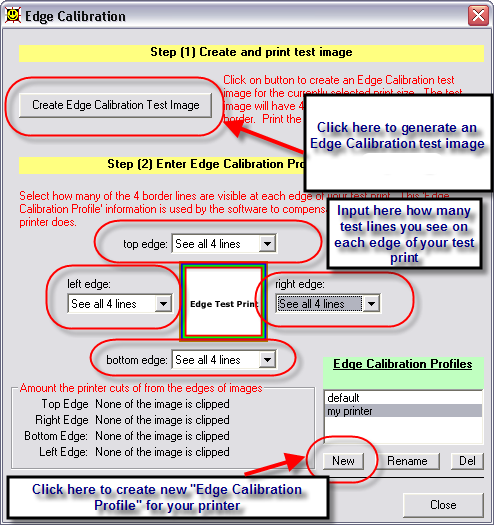
Here are the steps to creating a new
"Edge Calibration Profile" for your printer:
(i) Select the paper size and
margins that you are using via the Paper size dialog
(ii) Open the Edge Calibration dialog (shown above here)
(iii) Generate an Edge Calibration test image for your paper size by clicking
on the "Create Edge Calibration Test Image" button. Save the image onto
your hard drive.
(iv) Print the Edge Calibration test image on your printer using the same
printer settings that you will use when you will be printing your poster
(v) Create a new "Edge Calibration Profile" for your printer by clicking the
"New" button on the "Edge Calibration" dialog and entering a name for your new
profile when prompted
(vi) Count how many lines are visible on each edge of the Edge Calibration Test
print. Enter this information in the Edge Calibration dialog for
your new Edge Calibration Profile selected.
(vii) Click on the "Close" button when done. Your new Edge Calibration
Profile has been completed.
(viii) Your new Edge Calibration Profile should now show up in the "Edge
Adjust" dropdown box of the main Poster Buddy dialog
(C) When
to use Edge Calibration - The "Adjust edges"
or "Edge Calibration" feature is primarily used when doing borderless
printing. If your printer is clipping off parts of the edges of images
and you are NOT doing borderless printing, then the chances are that there is
a problem with your printer software settings. In that case, look at
your printer software settings and make sure that no option for "crop to fit"
or anything that might crop off part of your images is selected.
The table below here shows
whether or not "Edge Calibration" would be needed for some various
printer/paper combinations:
|
Printer/Paper
|
Need To Use Edge Calibration?
|
| HP Inkjet printing on letter size paper, set to print an
8x10 image size inch (0.5 inch top and bottom margins, 0.25 left and right
margins) |
NO
|
| Epson inkjet print, set to print letter size paper, borderless mode
|
YES
|
| Kodak Easyshare dye sublimation 4x6 inch printer |
YES
|
| Walmart photo lab, printing 4x6 inch photos |
YES
|
Go to Top of Page
|
|
(6) Zooming/Panning/Sizing
Your Poster
|
|
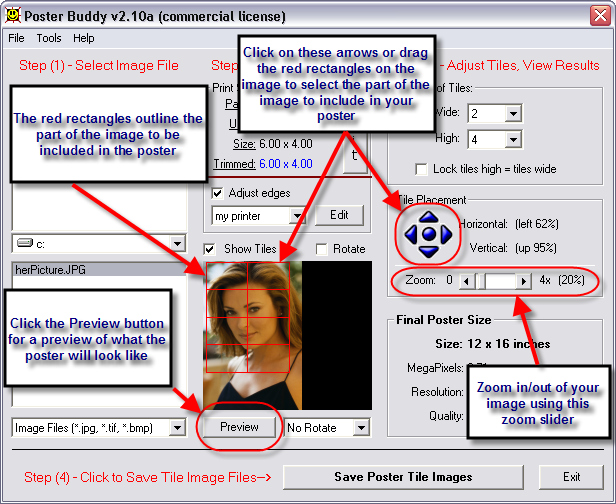
Poster Buddy lets you select what part of your source image to include in
your poster. You can zoom into your source image and/or pan left/right or
up/down.
(A) Panning
and Zooming:
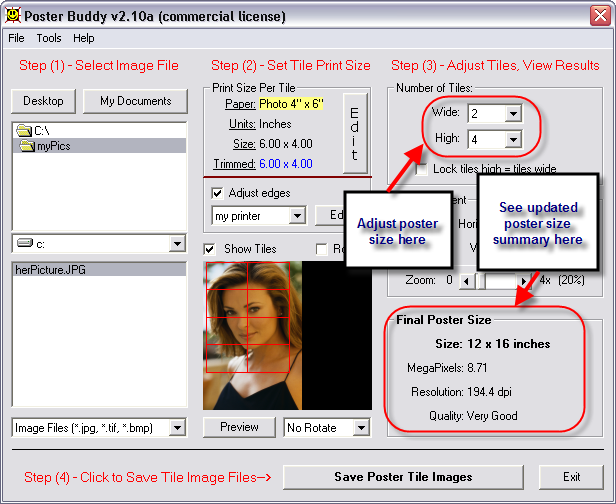
(B) Selecting
Poster Size:
The size of the poster is determined by
the paper/margin size along with the number of tiles Wide/High for the
poster. You select the number of tiles from the "Number of Tiles" section
on the main dialog. A summary of the final poster size and quality
is continuously updated and displayed:
Go to Top of Page
|
|
(7) Saving
Poster Images
|
|
When you are ready to create your poster, simply click on the Save Poster Tile
button. That will open the Poster Save dialog.
(A) Poster
Save Options:
The save poster dialog allows you to
select where you want your poster images to be saved, as well as what the
folder name, filenames and format for the poster images will be. By
default, the poster images will be saved in the same folder as the poster
source image.
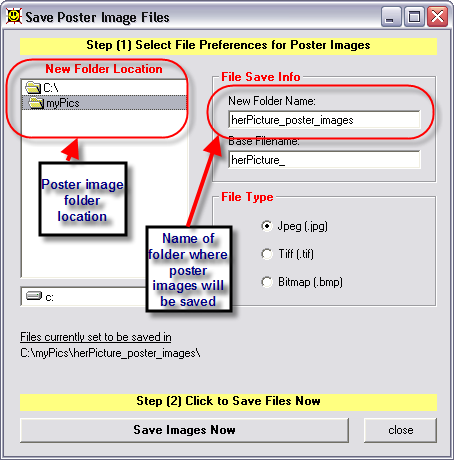
Click on the "Save Images Now" button to
proceed with saving your poster images.
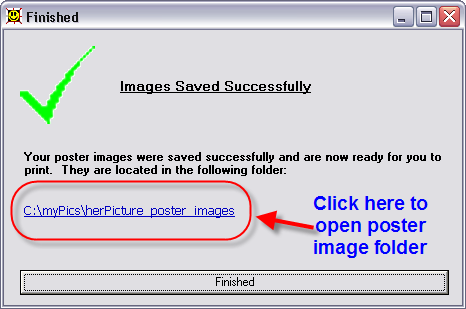
(B) Poster
Images:
When the poster images have been saved, a
confirmation dialog is displayed. You can click on the hyperlink to open
the poster image folder:
Go to Top of Page
|
|
(8)
Printing Poster Images
|
|
The next step is to print the poster tile images that were just created by
Poster Buddy.
(A) Print
Applications:
The poster images can be printed using
just about any imaging application. You can also print the poster images
using the Windows print wizard. One good (and free)
application that can be used to print your images is Irfanview.
(B)
Printer Settings:
There are several key points to remember
when selecting the settings to print your poster images:
(i) Avoid any settings that will
automatically adjust the lightness or color of the poster images. This
could result in a mismatch between adjacent poster tiles that could look
bad.
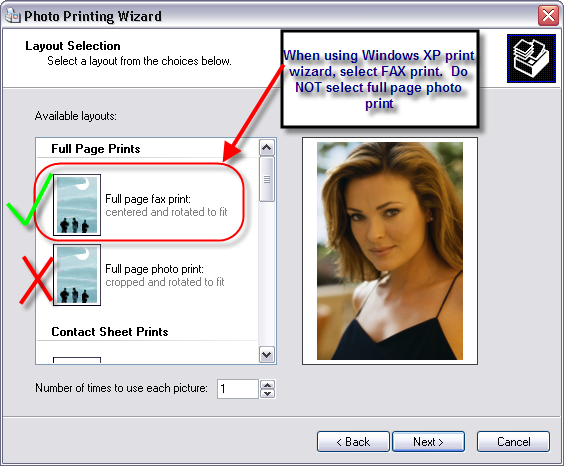
(ii) Avoid any setting that will crop
your image. When printing with the Microsoft Print Wizard, you should
select the "Full page fax print" option instead of the "Full page photo print"
option. This might sound counterintuitive, but it is absolutely
necessary for poster printing (because it avoids image cropping).
Choosing the Fax option doesn't affect image quality, it only affects the
layout of the image on the page.
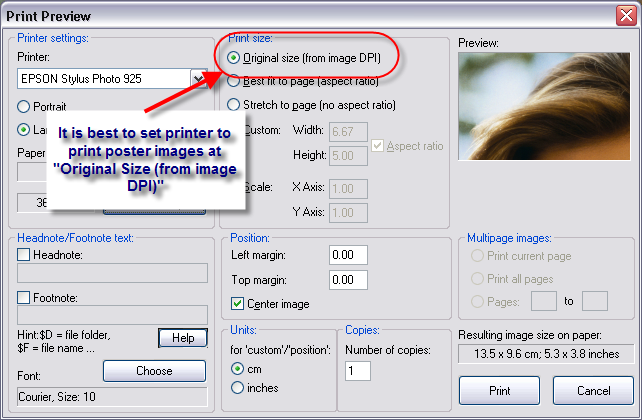
(iii) If using Irfanview, then select
the option to print the image based on the internal image
resolution. This will ensure that the image isn't cropped and that it
prints at the correct size.
Go to Top of Page
|
|
(9) Finishing
the Poster
|
|
Once the poster is printed (and any margins trimmed off) then you can assemble
the poster tiles together. Optionally, you can also mount the poster in a
frame or on a foam board.
(A) Trim
Poster Margins If Needed:
If your poster tile prints are not
borderless, then you probably want to trim the borders off. You can
either do this manually with a pair of scissors, or for a cleaner and
straighter cut you can use a paper cutter. Try to cut as straight as
possible, and be sure not to cut off any part of the actual image.
(B)
Assemble the Poster:
The next step is to place the poster
tiles, edge to edge, on a flat surface to see how the poster
looks.
The next step is to connect the
tiles together. The best way to do this is to tape the backs of the tile
prints together. Clear scotch tape should work fine for this.
When you flip the tiles over to tape them, you need to be sure that the
orientation is correct. You should flip them as if you were flipping
the entire poster. It is a good idea to flip one row at a time, and
flip them so that the far left image now become the far right image, etc.
Check the tile prints before you start taping them together to make sure they
are in the right order. The first time you do this, it can seem a bit
confusing, but after that it should be easy.
(C)
Mounting The Poster:
For an especially nice finishing touch,
you can mount your poster onto either poster board or into a picture
frame. You can purchase poster frames anywhere, and poster board can be
found at arts and crafts or office supply stores. Both can be very
inexpensive.
Go to Top of Page
|
|
|
|
|
|
|